在 centOS9 上编译安装 Nginx
官方网址:http://nginx.org/en/download.html
Nginx官网提供了三个类型的版本
- Mainline version:Mainline 是 Nginx 目前主力在做的版本,可以说是开发版
- Stable version:最新稳定版,生产环境上建议使用的版本
- Legacy versions:遗留的老版本的稳定版

建立 nginx 用户
#创建用户组groupadd www #创建用户useradd www -g www -M -s /sbin/nologin #使用 groups 查看用户所在的组groups www
- -g:指定新用户所属的用户组(group)。
- -M:不建立根目录。
- -s:定义其使用的shell。
- /sbin/nologin:代表用户不能登录系统。
下载解压Nginx
cd /usr/local/srcwget -c http://nginx.org/download/nginx-1.24.0.tar.gztar -zxf nginx-1.24.0.tar.gzcd /usr/local/src/nginx-1.24.0
编译安装 Nginx
./configure --prefix=/usr/local/nginx --conf-path=/usr/local/nginx/conf/nginx.conf --http-log-path=/var/log/nginx/access.log --error-log-path=/var/log/nginx/error.log --with-http_stub_status_module --with-http_ssl_module

make
make install

通过软链接的方式设置 nginx 为全局。
ln -s /usr/local/nginx/sbin/nginx /usr/local/sbin/nginx
建立软链接后,我们便可以在任意目录执行nginx命令。上面的启动停止命令简便为:
#启动 Nginxnginx #停止 Nignxnginx -s stop #停止Nignxnginx -s quick #检查 Nginx 配置是否正确nginx -t
nginx文件目录
- 程序:/usr/local/nginx/sbin/nginx
- 配置:/usr/local/nginx/conf/nginx.conf
- pid:/usr/local/nginx/logs/nginx.pid
- log:/var/log/nginx/error.log
- log:/var/log/nginx/access.log
配置 nginx
vim /usr/local/nginx/conf/nginx.conf
修改运行 nginx 用户、web 根目录、默认字符集、开启 gzip。此处仅展示支持 vue3 站点。域名:https://www.example.com
user www;
worker_processes  2;

error_log  /var/log/nginx/error.log  error;
pid  /usr/local/nginx/logs/nginx.pid;


events {
    worker_connections  1024;
}


http {
    include       mime.types;
    default_type  application/octet-stream;

    access_log  off;

    sendfile        on;
    #tcp_nopush     on;

    #keepalive_timeout  0;
    keepalive_timeout  65;


    gzip  on;
        gzip_http_version 1.1;
        gzip_vary on;
        gzip_comp_level 3;
        gzip_proxied any;
        gzip_types text/plain text/css application/json application/x-javascript text/xml application/xml application/xml+rss text/javascript image/jpeg image/gif image/png;
        gzip_min_length 1;
        gzip_buffers 16 8k;
        gzip_disable "MSIE [1-6].(?!.*SV1)";

     client_max_body_size 20M;


    # 开始配置 支持 vue 前端
    # HTTPS 协议,所以把 80 端口,都跳转到 443 端口
    server {
        listen  80;
        server_name  example.com;
        rewrite ^(.*)$ https://www.example.com$1 permanent;
    }
    server {
        listen  80;
        server_name  www.example.com;
        rewrite ^(.*)$ https://www.example.com$1 permanent;
    }

    # 443 端口下,设置 HTTPS 协议使用的 SSL 证书
    server {
        listen       443 ssl;
        server_name  www.example.com;
        root /var/web/www/exampleHome;
        index index.html;
        charset utf-8;

        add_header X-Frame-Options "SAMEORIGIN";
        add_header X-XSS-Protection "1; mode=block";
        add_header X-Content-Type-Options "nosniff";


        ssl_certificate      "/usr/local/nginx/cert/example/example.com_bundle.crt";
        ssl_certificate_key  "/usr/local/nginx/cert/example/example.com.key";

        ssl_session_cache    shared:SSL:1m;
        ssl_session_timeout  10m;

        ssl_ciphers  HIGH:!aNULL:!MD5;
        ssl_prefer_server_ciphers  on;

        location / {
              try_files $uri $uri/ /index.html;
        }

        location = /favicon.ico { access_log off; log_not_found off; }
        location = /robots.txt  { access_log off; log_not_found off; }


        error_page 404 /index.html;
        error_page   500 502 503 504  /50x.html;
        location = /50x.html {
            root /usr/local/nginx/html;
        }

        location ~ /\.(?!well-known).* {
                deny all;
         }
     }

}
Nginx 文件上传大小设置
client_max_body_size :设置允许客户端请求正文的最大长度。默认 1M。请求的长度由Content-Length请求头指定。如果请求的长度超过设定值,nginx 将返回错误413 Request Entity Too Large到客户端。请注意浏览器不能正确显示这个错误。设置成 0 可以使 nginx 不检查客户端请求正文的长度。如果需要上传大于 1M 文件,一定要修改该值。client_body_buffer_size :设置读取客户端请求正文的缓冲容量。在 x86 平台、其他 32 位平台和 x86-64 平台,这个值是 8K。在其他 64 位平台,这个值一般是 16K。如果请求正文数据小于client_body_buffer_size缓冲容量,整个正文数据在内存中存储。如果请求正文数据大于client_body_buffer_size缓冲容量,整个正文或者正文的一部分将写入临时文件。缓冲大小默认等于两块内存页的大小。client_body_temp :临时文件,默认该路径值是/tmp。自定义配置的 client_body_temp 地址,一定让执行的 Nginx 的用户组有读写权限。否则,当传输的数据大于client_body_buffer_size,写进临时文件失败会报错。
Nginx 日志
- 日志文件位置:在 Nginx 时候,已经设置了日志的位置为:/var/log/nginx目录下;所以在配置文件nginx.conf中,不需要再次配置。在编辑安装的时候,若没指定位置,那么默认会在 nginx 程序的 logs 目录中。
- 日志文件类型:共有两种。error.log是有 server 操作记录日志,默认级别为:error;access.log是有 http 访问记录日志,默认格式:main。
- error.log级别:记录内容由多到少顺序:debug、info、notice、warn、error、crit。默认为 error 级别。crit 记录的日志最少,而 debug 记录的日志最多。
- 关闭日志配置:在配置文件nginx.conf中,
error.log /dev/null;access.log /dev/null或者access.log off。 - 清空日志文件:
- error.log:
echo "">/var/log/nginx/error.log,cat /dev/null >/var/log/nginx/error.log,truncate -s 0 /var/log/nginx/error.log; - access.log:
echo "">/var/log/nginx/access.log,cat /dev/null >/var/log/nginx/access.log,truncate -s 0 /var/log/nginx/access.log。
- error.log:
添加为系统服务
使用systemctl命令管理服务,适用centOS7、centOS8。使用systemd自定义系统服务。systemctl脚本存放在:/usr/lib/systemd/,有系统(system)和用户(user)之分,即:/usr/lib/systemd/system,/usr/lib/systemd/user。每一个服务以.service结尾,一般会分为3部分:[Unit]、[Service]和[Install]
第一步:创建nginx.service文件
vim /usr/lib/systemd/system/nginx.service
在nginx.service文件写入如下内容。重启系统即可开机启动。文件内容:
[Unit]
Description=nginx
After=network.target remote-fs.target nss-lookup.target

[Service]
Type=forking
PIDFile=/usr/local/nginx/logs/nginx.pid
ExecStartPre=/usr/local/nginx/sbin/nginx -t -c /usr/local/nginx/conf/nginx.conf
ExecStart=/usr/local/nginx/sbin/nginx -c  /usr/local/nginx/conf/nginx.conf
ExecReload=/usr/local/nginx/sbin/nginx -s reload
ExecStop=/usr/local/nginx/sbin/nginx -s stop
ExecQuit=/usr/local/nginx/sbin/nginx -s quit

KillSignal=SIGQUIT
TimeoutStopSec=5
KillMode=process
PrivateTmp=true

[Install]
WantedBy=multi-user.target
第二步:设置开启自启动
systemctl enable nginx
systemctl 管理命令
systemctl start nginx #启动 nginxsystemctl stop nginx #停止 nginxsystemctl quit nginx #快速停止关闭 nginxsystemctl restart nginx #重启 nginxsystemctl reload nginx #重新加载配置systemctl status nginx #查看 nginx 运行状态systemctl enable nginx #开机自启动 nginxsystemctl disable nginx #禁止开机启动 nginx
安装网络管理工具包
netstat命令作用是用于显示 tcp,udp 的端口和进程等相关情况,可以利用 netstat 指令可得知整个 Linux 系统的网络情况。
dnf -y install net-tools
直接结束占用端口的进程:killall+进程名(比如重启nginx时进程没有完全退出,导致重启失败)
dnf -y install psmisc 杀死 nginx 全部进程killall nginx
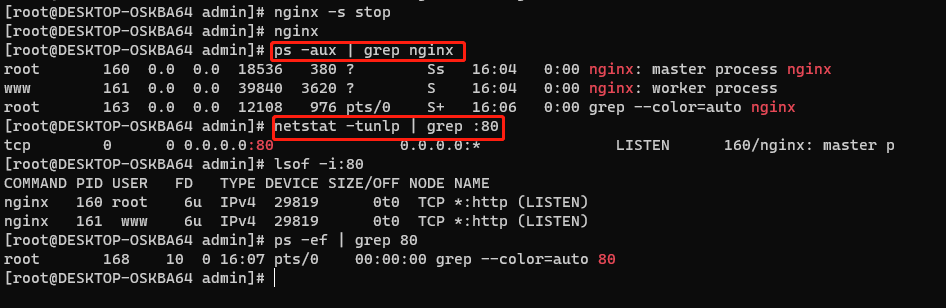
查看nginx进程
ps -aux | grep nginx
查看80端口是否被占用
ps -ef | grep 80lsof -i:80netstat -tunlp | grep :80netstat -anp | grep :80