描述
HTML5 <canvas> 标签用于绘制图像(通过脚本,通常是 JavaScript)。
不过,<canvas> 元素本身并没有绘制能力(它仅仅是图形的容器) - 您必须使用脚本来完成实际的绘图任务。
getContext() 方法可返回一个对象,该对象提供了用于在画布上绘图的方法和属性。
本手册提供完整的 getContext("2d") 对象的属性和方法,可用于在画布上绘制文本、线条、矩形、圆形等等。
浏览器支持
 |  |  |  |  |
| Internet Explorer 9、Firefox、Opera、Chrome 和 Safari 支持 <canvas> 标签的属性及方法。 |
| 注意:Internet Explorer 8 及更早的IE版本不支持 <canvas> 元素。 |
颜色、样式和阴影
| 属性 | 描述 |
|---|
| fillStyle | 设置或返回用于填充绘画的颜色、渐变或模式。 |
| strokeStyle | 设置或返回用于笔触的颜色、渐变或模式。 |
| shadowColor | 设置或返回用于阴影的颜色。 |
| shadowBlur | 设置或返回用于阴影的模糊级别。 |
| shadowOffsetX | 设置或返回阴影与形状的水平距离。 |
| shadowOffsetY | 设置或返回阴影与形状的垂直距离。 |
| 方法 | 描述 |
|---|
| createLinearGradient() | 创建线性渐变(用在画布内容上)。 |
| createPattern() | 在指定的方向上重复指定的元素。 |
| createRadialGradient() | 创建放射状/环形的渐变(用在画布内容上)。 |
| addColorStop() | 规定渐变对象中的颜色和停止位置。 |
线条样式
| 属性 | 描述 |
|---|
| lineCap | 设置或返回线条的结束端点样式。 |
| lineJoin | 设置或返回两条线相交时,所创建的拐角类型。 |
| lineWidth | 设置或返回当前的线条宽度。 |
| miterLimit | 设置或返回最大斜接长度。 |
矩形
| 方法 | 描述 |
|---|
| rect() | 创建矩形。 |
| fillRect() | 绘制"被填充"的矩形。 |
| strokeRect() | 绘制矩形(无填充)。 |
| clearRect() | 在给定的矩形内清除指定的像素。 |
路径
| 方法 | 描述 |
|---|
| fill() | 填充当前绘图(路径)。 |
| stroke() | 绘制已定义的路径。 |
| beginPath() | 起始一条路径,或重置当前路径。 |
| moveTo() | 把路径移动到画布中的指定点,不创建线条。 |
| closePath() | 创建从当前点回到起始点的路径。 |
| lineTo() | 添加一个新点,然后在画布中创建从该点到最后指定点的线条。 |
| clip() | 从原始画布剪切任意形状和尺寸的区域。 |
| quadraticCurveTo() | 创建二次贝塞尔曲线。 |
| bezierCurveTo() | 创建三次贝塞尔曲线。 |
| arc() | 创建弧/曲线(用于创建圆形或部分圆)。 |
| arcTo() | 创建两切线之间的弧/曲线。 |
| isPointInPath() | 如果指定的点位于当前路径中,则返回 true,否则返回 false。 |
转换
| 方法 | 描述 |
|---|
| scale() | 缩放当前绘图至更大或更小。 |
| rotate() | 旋转当前绘图。 |
| translate() | 重新映射画布上的 (0,0) 位置。 |
| transform() | 替换绘图的当前转换矩阵。 |
| setTransform() | 将当前转换重置为单位矩阵。然后运行 transform()。 |
文本
| 属性 | 描述 |
|---|
| font | 设置或返回文本内容的当前字体属性。 |
| textAlign | 设置或返回文本内容的当前对齐方式。 |
| textBaseline | 设置或返回在绘制文本时使用的当前文本基线。 |
| 方法 | 描述 |
|---|
| fillText() | 在画布上绘制"被填充的"文本。 |
| strokeText() | 在画布上绘制文本(无填充)。 |
| measureText() | 返回包含指定文本宽度的对象。 |
图像绘制
| 方法 | 描述 |
|---|
| drawImage() | 向画布上绘制图像、画布或视频。 |
像素操作
| 属性 | 描述 |
|---|
| width | 返回 ImageData 对象的宽度。 |
| height | 返回 ImageData 对象的高度。 |
| data | 返回一个对象,其包含指定的 ImageData 对象的图像数据。 |
| 方法 | 描述 |
|---|
| createImageData() | 创建新的、空白的 ImageData 对象。 |
| getImageData() | 返回 ImageData 对象,该对象为画布上指定的矩形复制像素数据。 |
| putImageData() | 把图像数据(从指定的 ImageData 对象)放回画布上。 |
合成
| 属性 | 描述 |
|---|
| globalAlpha | 设置或返回绘图的当前 alpha 或透明值。 |
| globalCompositeOperation | 设置或返回新图像如何绘制到已有的图像上。 |
其他
| 方法 | 描述 |
|---|
| save() | 保存当前环境的状态。 |
| restore() | 返回之前保存过的路径状态和属性。 |
| createEvent() | |
| getContext() | |
| toDataURL() | |
以前在网页中进行交互绘图是很困难的(需要依赖额外的第三方插件),而引入的Canvas特性使得作者可以很容易的在网页上绘制各种图形和图像。
Canvas提供了脚本(JavaScript)应用接口,我们可以使用JS代码来操作画布,添加各种图形以及实现用户交互。这些特性使得HTML5在开发网页游戏和一些复杂的网页动画上变得更加方便。
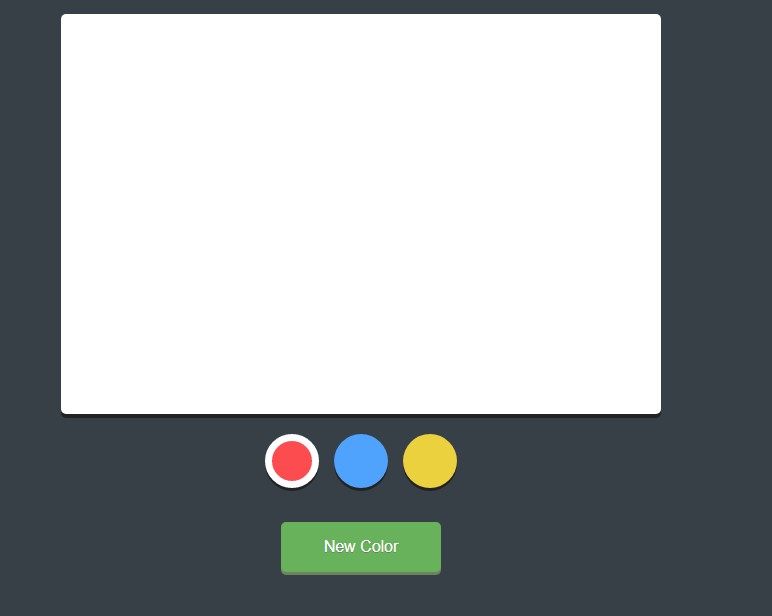
比如下面这个例子,使用Canvas实现了简单的在线画板功能,你可以直接在网页上绘制线条:
HTML
<script src="/libs/jquery/jquery-2.1.1.min.js"></script>
<canvas width="600" height="400"></canvas>
<div class="controls">
    <ul>
        <li class="red selected"></li>
        <li class="blue"></li>
        <li class="yellow"></li>
    </ul>
    <button id="revealcolorselect">new color</button>
    <div id="colorselect">
        <span id="newcolor"></span>
        <div class="sliders">
            <p>
                <label for="red">red</label>
                <input id="red" name="red" type="range" min=0 max=255 value=0>
            </p>
            <p>
                <label for="green">green</label>
                <input id="green" name="green" type="range" min=0 max=255 value=0>
            </p>
            <p>
                <label for="blue">blue</label>
                <input id="blue" name="blue" type="range" min=0 max=255 value=0>
            </p>
        </div>
        <div>
            <button id="addnewcolor">add color</button>
        </div>
    </div>
</div>
CSS
body {
    background: #384047;
    font-family: sans-serif;
}
canvas {
    background: #fff;
    display: block;
    margin: 30px auto 10px;
    border-radius: 5px;
    box-shadow: 0 4px 0 0 #222;
    cursor: crosshair;
}
.controls {
    min-height: 60px;
    margin: 0 auto;
    width: 600px;
    border-radius: 5px;
    overflow: hidden;
}
ul {
    list-style: none;
    margin: 0;
    float: left;
    padding: 10px 0 20px;
    width: 100%;
    text-align: center;
}
ul li,
#newcolor {
    display: block;
    height: 54px;
    width: 54px;
    border-radius: 60px;
    cursor: pointer;
    border: 0;
    box-shadow: 0 3px 0 0 #222;
}
ul li {
    display: inline-block;
    margin: 0 5px 10px;
}
.red {
    background: #fc4c4f;
}
.blue {
    background: #4fa3fc;
}
.yellow {
    background: #ecd13f;
}
.selected {
    border: 7px solid #fff;
    width: 40px;
    height: 40px;
}
button {
    background: #68b25b;
    box-shadow: 0 3px 0 0 #6a845f;
    color: #fff;
    outline: none;
    cursor: pointer;
    text-shadow: 0 1px #6a845f;
    display: block;
    font-size: 16px;
    line-height: 40px;
}
#revealcolorselect {
    border: none;
    border-radius: 5px;
    margin: 10px auto;
    padding: 5px 20px;
    width: 160px;
    /* new color palette */
}
#colorselect {
    background: #fff;
    border-radius: 5px;
    clear: both;
    margin: 20px auto 0;
    padding: 10px;
    width: 305px;
    position: relative;
    display: none;
}
#colorselect:after {
    bottom: 100%;
    left: 50%;
    border: solid transparent;
    content: " ";
    height: 0;
    width: 0;
    position: absolute;
    pointer-events: none;
    border-color: rgba(255, 255, 255, 0);
    border-bottom-color: #fff;
    border-width: 10px;
    margin-left: -10px;
}
#newcolor {
    width: 80px;
    height: 80px;
    border-radius: 3px;
    box-shadow: none;
    float: left;
    border: none;
    margin: 10px 20px 20px 10px;
}
.sliders p {
    margin: 8px 0;
    vertical-align: middle;
}
.sliders label {
    display: inline-block;
    margin: 0 10px 0 0;
    width: 35px;
    font-size: 14px;
    color: #6d574e;
}
.sliders input {
    position: relative;
    top: 2px;
}
#colorselect button {
    border: none;
    border-top: 1px solid #6a845f;
    border-radius: 0 0 5px 5px;
    clear: both;
    margin: 10px -10px -7px;
    padding: 5px 10px;
    width: 325px;
}
p {
    color: #fff;
    padding-left: 46%;
}
JS
var color = $(".selected").css("background-color");
var $canvas = $("canvas");
var context = $canvas[0].getcontext("2d");
var lastevent;
var mousedown = false;
//when clicking on control list items
$(".controls").on("click", "li", function() {
    //deselect sibling elements
    $(this).siblings().removeclass("selected");
    //select clicked element
    $(this).addclass("selected");
    //cache current color
    color = $(this).css("background-color");
}
);
//when "new color" is pressed
$("#revealcolorselect").click(function() {
    //show color select or hide the color select
    changecolor();
    $("#colorselect").toggle();
}
);
//update the new color span
function changecolor() {
    var r = $("#red").val();
    var g = $("#green").val();
    var b = $("#blue").val();
    $("#newcolor").css("background-color", "rgb(" + r + "," + g + ", " + b + ")");
}
//when color sliders change
$("input[type=range]").change(changecolor);
//when "add color" is pressed
$("#addnewcolor").click(function() {
    //append the color to the controls ul
    var $newcolor = $("");
    $newcolor.css("background-color", $("#newcolor").css("background-color"));
    $(".controls ul").append($newcolor);
    //select the new color
    $newcolor.click();
}
);
//on mouse events on the canvas
$canvas.mousedown(function(e) {
    lastevent = e;
    mousedown = true;
}
).mousemove(function(e) {
    //draw lines
    if (mousedown) {
        context.beginpath();
        context.moveto(lastevent.offsetx, lastevent.offsety);
        context.lineto(e.offsetx, e.offsety);
        context.strokestyle = color;
        context.stroke();
        lastevent = e;
    }
}
).mouseup(function() {
    mousedown = false;
}
).mouseleave(function() {
    $canvas.mouseup();
}
).mouseleave(function() {
    $canvas.mouseup();
}
);
实际上Canvas规范包含两个部分,一个是HTML5新引入的canvas元素,还有更为关键的2D渲染上下文。实际上前者只是一个容器,后者才是真正绘图的地方。它包含绘图和图形操作所需要的全部方法和丰富功能。
强调一下:绘图是在2D渲染上下文中进行的,而不是在canvas元素中进行。可以通过canvas元素访问和显示2D渲染上下文。
canvas元素的语法很简单,除了id和class外,还有两个和容器尺寸相关的属性:宽和高。
<canvas id="mycanvas" height="500" width="500"></canvas>