vite + vue3 + ts 开发配置
.env 文件
Vite 在一个特殊的import.meta.env对象上暴露环境变量。这里有一些在所有情况下都可以使用的内建变量:
import.meta.env.MODE :{string}应用运行的模式。import.meta.env.BASE_URL :{string}部署应用时的基本 URL。他由 base 配置项决定。import.meta.env.PROD :{boolean}应用是否运行在生产环境。import.meta.env.DEV :{boolean}应用是否运行在开发环境(永远与 import.meta.env.PROD 相反)。
详细查看:https://cn.vitejs.dev/guide/env-and-mode.html#env-files
第一步:项目根目录下,新建.env文件。其内容为指定的,自定义基础网址。
VITE_BASE_URL = https://api.example.com
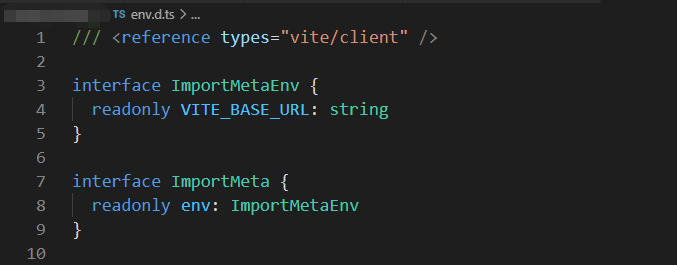
第二步:项目根目录下,env.d.ts文件中,增加ImportMetaEnv的定义:
/// <reference types="vite/client" />
interface ImportMetaEnv {
readonly VITE_BASE_URL : string
}
interface ImportMeta {
readonly env : ImportMetaEnv
}
第三步:修改tsconfig.app.json文件:
{
  "extends": "@vue/tsconfig/tsconfig.web.json",
  "include": ["env.d.ts", "src/**/*", "src/**/*.vue"],
  "exclude": ["src/**/__tests__/*"],
  "compilerOptions": {
    "composite": true,
    "lib": ["dom", "esnext"],
    "types": ["node", "jsdom", "vite/client", "element-plus/global"],
    "target": "esnext",
    "module": "esnext",
    "strict": true,
    "baseUrl": ".",
    "paths": {
      "@/*": ["./src/*"]
    }
  }
}
测试配置文件tsconfig.vitest.json文件,也需要做相应的修改。
{
  "extends": "./tsconfig.app.json",
  "exclude": [],
  "compilerOptions": {
    "composite": true,
    "lib": ["dom", "esnext"],
    "types": ["node", "jsdom", "vite/client", "element-plus/global"],
    "target": "esnext",
    "module": "esnext",
    "strict": true
  }
}

使用举例
axios.defaults.baseURL = import.meta.env.VITE_BASE_URL ;
配置格式化
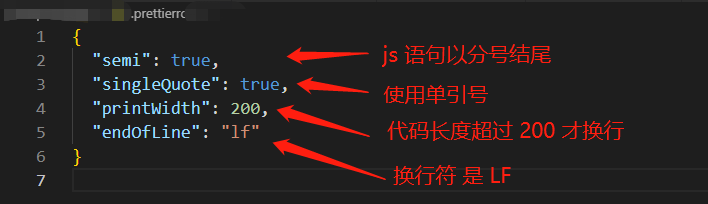
在项目根目录下,.prettierrc.json文件(若没有则自己新建个)。
{
  "semi": true,
  "singleQuote": true,
  "printWidth": 200,
  "endOfLine": "lf"
}
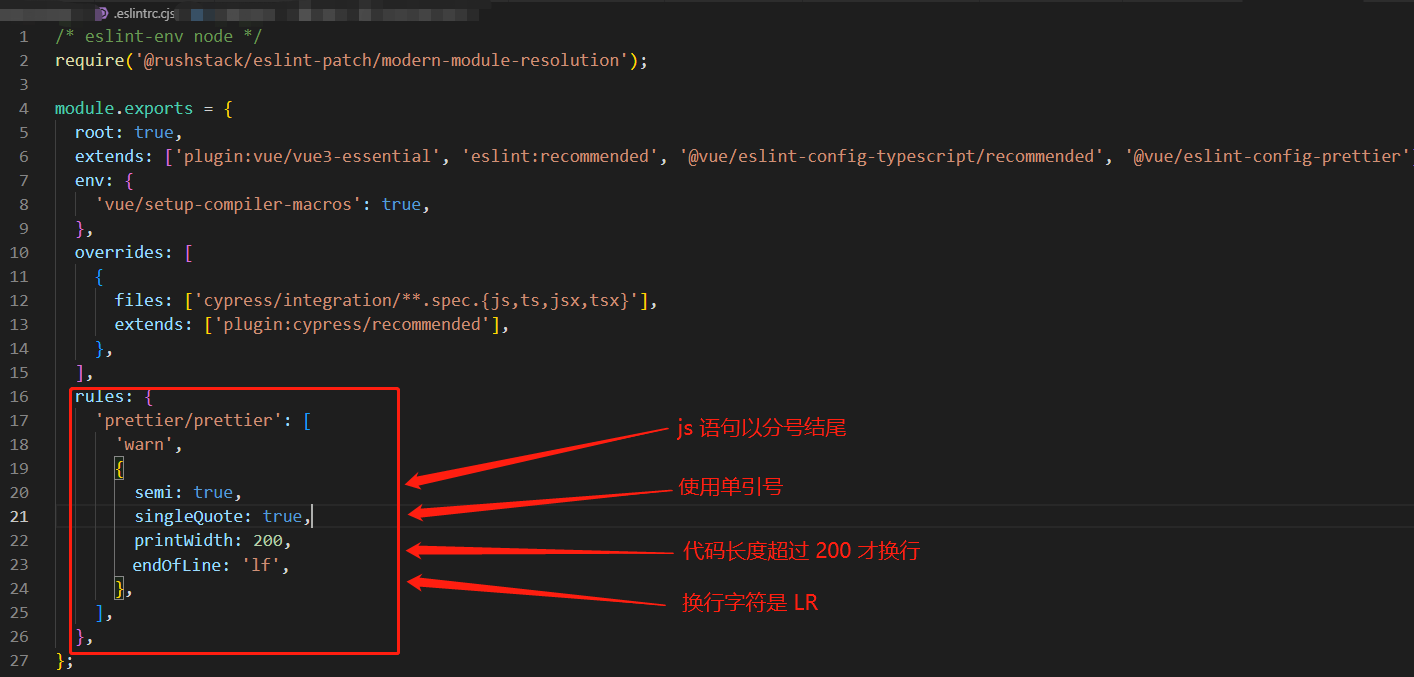
在项目根目录中,修改.eslintrc.cjs配置。
rules: {
   'prettier/prettier': [
    'warn',
    {
        semi: true,
        singleQuote: true,
	printWidth: 200,
	endOfLine: 'lf',
    },
  ],
},
配置完毕后,运行命令。格式化文件。
npm run lint
重启编辑软件vscode后生效。